In summary:
- Your primary enemy is lack of light. Use a lens with at least an f/2.8 aperture and a camera capable of clean images at ISO 1600-3200.
- Extreme cold is your second enemy. It drains batteries and can freeze equipment. Master thermal management to keep your gear operational.
- Success depends on defeating unpredictability. Learn to read solar data and local forecasts to avoid waiting in the cold for nothing.
- A great aurora photo tells a story. Use iconic Canadian foregrounds to create a compelling compositional narrative beyond just a green sky.
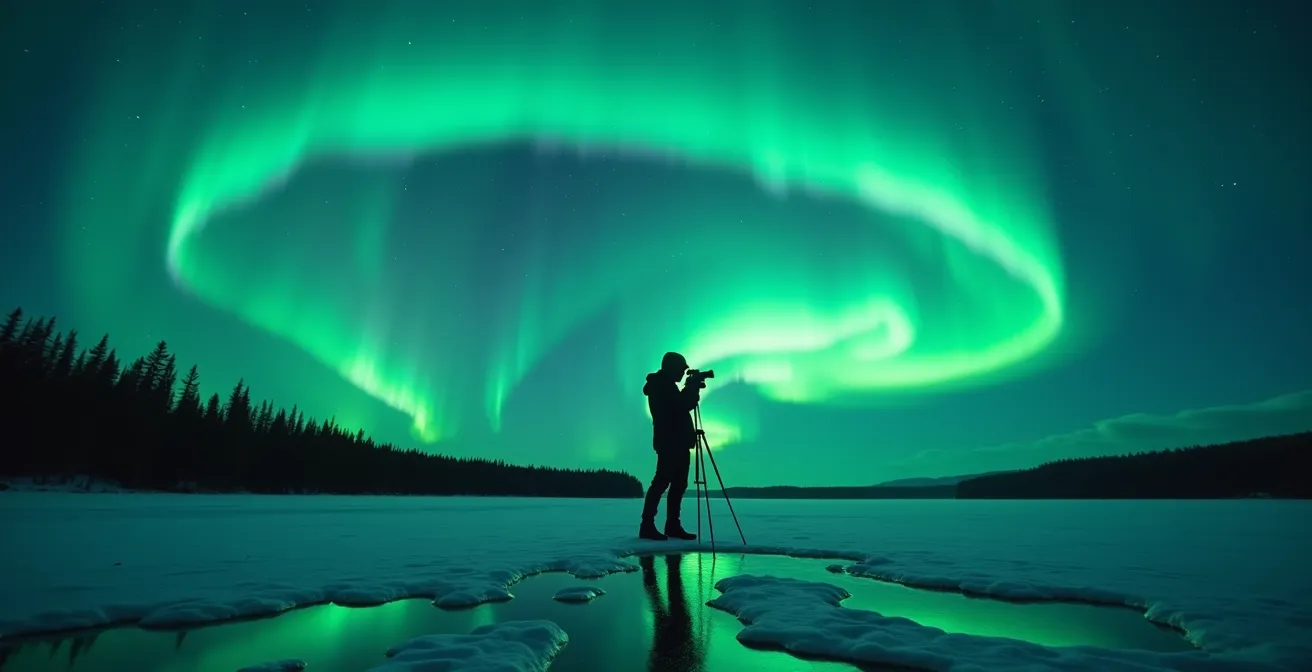
You’ve stood there, shivering in the Canadian dark, watching the sky dance with an ethereal green light. You point your phone at the spectacle, press the button, and the result is… a blurry, black screen with a faint, noisy smudge. It’s a frustration every aspiring night photographer knows well. The disconnect between what your eyes see and what your camera captures can feel immense. Many will tell you the solution is simply to get a “real camera” and use a magical combination of settings. They’ll list the standard advice: get a wide lens, use a high ISO, and set a long shutter speed.
But this advice only scratches the surface. It doesn’t prepare you for the real-world challenges of a northern photoshoot. Capturing the aurora isn’t about memorizing a few settings; it’s about mastering the physics of a hostile environment. True success lies in understanding and systematically defeating the three core enemies of northern photography: the profound lack of light, the crippling cold, and the sheer unpredictability of the atmosphere. Your camera isn’t just a recording device; it’s a scientific instrument you must protect and optimize against these forces.
This guide moves beyond the generic settings. We will dissect the technical choices and fieldcraft required to translate that breathtaking visual experience into a clean, sharp, and vibrant photograph. We will treat aurora photography not as a matter of luck, but as a discipline of preparation and environmental intelligence. By understanding the ‘why’ behind each decision, you can stop fighting your gear and start creating the images you’ve always envisioned.
To help you master this craft, this article breaks down the essential skills, from core camera principles to advanced environmental strategies. The following sections will provide a complete roadmap for your next aurora-chasing adventure.
Summary: Your Guide to Flawless Aurora Photography
- Aperture Matters: Why f/2.8 Is the Minimum for Aurora Photography?
- Tripods in the Snow: How to Prevent Sinking and Shaking on Frozen Ground?
- Forecasting the Lights: How to Read Solar Data to Avoid Standing in the Cold for Nothing?
- The Cold Drain: Why Your Camera Dies in 15 Minutes and How to Fix It?
- Foreground Interest: Why Just the Sky Makes for a Boring Aurora Photo?
- Aurora Borealis: Why February Is Better Than December for Viewing?
- Golden Hour in the Rockies: Why Sunrise Beats Sunset for Lake Photography?
- Atmospheric Photography: How to Shoot Moody Landscapes in the Mist?
Aperture Matters: Why f/2.8 Is the Minimum for Aurora Photography?
The fundamental challenge of aurora photography is capturing faint light over vast distances. Your camera’s lens aperture is the gateway for that light. Think of it as the pupil of your camera’s eye; the wider it opens, the more light it can gather in a short amount of time. This is measured in f-stops, where a lower number means a wider opening. An f/2.8 lens lets in twice as much light as an f/4 lens, and four times as much as an f/5.6 lens. This isn’t a minor detail—it’s the single most important factor in getting clean shots.
Why is this critical? A wider aperture allows you to use a lower ISO and a faster shutter speed. A lower ISO (like 1600 instead of 6400) drastically reduces the amount of digital “noise” or graininess in your image, which is the primary complaint from amateur photographers. Furthermore, a faster shutter speed (e.g., 8 seconds instead of 30) helps freeze the aurora’s movement, capturing crisp pillars and curtains instead of a blurry green cloud. It also prevents stars from turning into distracting streaks—a principle often managed by the “500 Rule” (dividing 500 by your lens’s focal length to find the max shutter speed for sharp stars).
While an f/2.8 lens is the functional minimum, faster prime lenses (f/1.8 or f/1.4) are the true game-changers. They allow you to capture stunning detail during fast-moving auroral displays with even lower noise levels. The investment in a “fast” wide-angle lens pays for itself with every clean, vibrant shot you bring home from the Canadian north, where locations like Churchill, Manitoba, can offer aurora visibility up to 300 nights per year.
The following table illustrates how your aperture choice directly impacts your other settings and the situations where each lens type excels.
| Lens Type | Aperture | ISO Required | Best Use Case |
|---|---|---|---|
| Ultra-fast Prime | f/1.4 | 800-1600 | Fast-moving corona events |
| Fast Wide-angle | f/2.8 | 1600-3200 | Standard aurora displays |
| Standard Zoom | f/4 | 3200-6400 | Bright displays only |
Tripods in the Snow: How to Prevent Sinking and Shaking on Frozen Ground?
Long exposure photography demands absolute stability. Any vibration, however minuscule, will turn a potentially brilliant shot into a blurry mess. While “use a sturdy tripod” is common advice, it’s woefully inadequate for the realities of the Canadian winter. Your tripod faces two specific enemies on frozen ground: sinking into soft snow and vibrating in the biting wind. A standard tripod’s pointed feet are designed for solid earth; in deep snow, they act like anchors, slowly sinking throughout your exposure.
The solution is to increase the surface area of the feet. Specialized “snow shoes” for tripods exist, but DIY solutions work just as well. Attaching tennis balls or small, durable plastic plates to the feet can effectively create flotation, keeping your setup stable on top of the snowpack. To combat wind, the principle is to lower your tripod’s center of gravity and add mass. Avoid extending the thin, vibration-prone lower leg sections and the center column unless absolutely necessary. A heavy camera bag hung from the center column’s hook adds significant weight and dampens wind-induced vibrations, anchoring your setup firmly to the ground.
Finally, the photographer is often the biggest source of vibration. Simply pressing the shutter button can shake the camera enough to ruin a shot. Always use a 2-second timer or a remote shutter release. This decouples the physical act of starting the exposure from the moment the shutter actually opens. According to experts at Peterson’s Point Lake Lodge in the Northwest Territories, it’s also wise to practice setting up your tripod and switching orientations from horizontal to vertical with gloves on before you go out, so you’re not fumbling in the dark and cold.
Your Action Plan: Field-Proofing Your Tripod for Canadian Winter
- Flotation: Attach tennis balls or small plastic plates to your tripod’s feet to prevent them from sinking into deep snow.
- Stability: Hang your heavy camera bag from the tripod’s center column hook to add weight and reduce wind-induced vibrations.
- Shake-Free Shots: Always use your camera’s 2-second timer or a remote shutter release to avoid introducing shake when you start the exposure.
- Ice Prevention: Before heading out, consider sealing the leg lock mechanisms with gaffer or electrical tape to prevent freezing moisture from jamming them.
- Practice: Rehearse extending, collapsing, and adjusting your tripod while wearing your winter gloves to build muscle memory before you’re in the field.
Forecasting the Lights: How to Read Solar Data to Avoid Standing in the Cold for Nothing?
The aurora is not a weather phenomenon; it’s a space weather phenomenon. Relying on luck is a recipe for a long, cold, and disappointing night. Mastering “atmospheric intelligence” means learning to read solar data to predict the likelihood, intensity, and location of a display. The Northern Lights are caused by charged particles from the sun interacting with Earth’s magnetic field. Therefore, the key is to monitor the sun’s activity and the state of our planet’s magnetosphere.
Your primary tool is the Kp-index, a scale from 0 to 9 that measures geomagnetic activity. A Kp of 4 or 5 often indicates a strong display visible across much of Canada. However, the Kp-index is just a general indicator. For more precision, you need to monitor the Bz component of the Interplanetary Magnetic Field (IMF). When the Bz is strongly negative (e.g., -10 nT or lower) and remains that way, it means the sun’s magnetic field is aligned to efficiently transfer energy into Earth’s magnetosphere, fueling a vibrant aurora. Websites like the NOAA Space Weather Prediction Center provide this data in near real-time.
In Canada, geography is also on your side. The auroral oval, the ring around the magnetic pole where aurora are most common, dips southward over the country’s central regions. This means that even during moderate activity, the auroral oval dips to its lowest latitude in Canada at 58° north at Churchill, Manitoba, making it one of the most reliable viewing locations on Earth. For local alerts, Canadian-specific resources are invaluable. AuroraWatch, based out of the University of Alberta, provides email alerts for the Edmonton area, while regional Facebook groups like ‘Alberta Aurora Chasers’ offer a network of real-time sightings from fellow photographers. Always cross-reference these aurora forecasts with your local cloud cover forecast—a Kp 7 is useless if your view is obscured by clouds.
The Cold Drain: Why Your Camera Dies in 15 Minutes and How to Fix It?
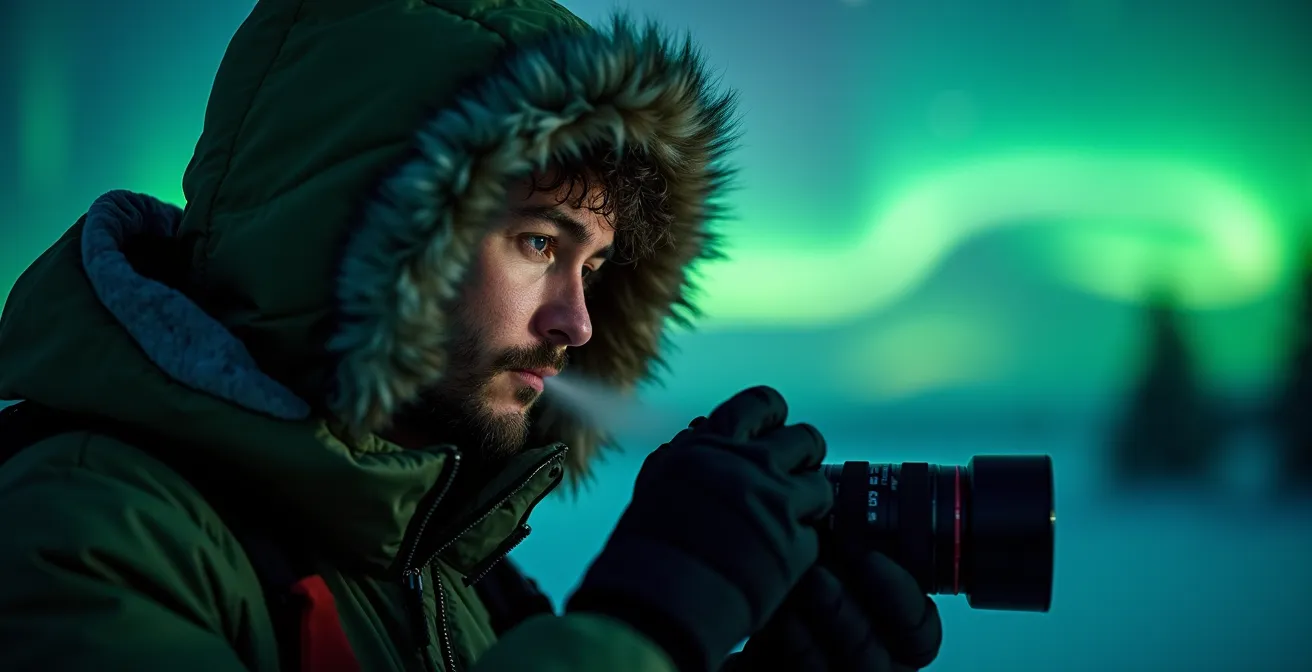
Extreme cold is the nemesis of electronics. In the -30°C (-22°F) or colder temperatures common during a Canadian winter aurora hunt, lithium-ion batteries suffer a dramatic drop in performance. The chemical reactions that generate power slow down, and a fully charged battery can appear dead in as little as 15-20 minutes. This is perhaps the most frustrating equipment failure a photographer can face. The solution is not to find a better battery, but to master thermal management.
The cardinal rule is to never let your batteries get cold. Carry at least three to four fully charged spares and keep them in an insulated pocket close to your body, such as an inner jacket pocket. Only swap a battery when the one in your camera is fully depleted. Some photographers even use chemical hand warmers in the same pocket to provide an extra heat source. This simple protocol can extend your shooting time from minutes to hours. The camera body itself can also be affected by the cold, with LCD screens becoming sluggish and moving parts stiffening.
Condensation is the second threat. When you bring a freezing-cold camera into a warm cabin or car, moisture will instantly condense on and inside it, risking catastrophic damage to the electronics and lens elements. To prevent this, place your entire camera and lens inside a sealed plastic bag (like a Ziploc) *before* going indoors. This forces the condensation to form on the outside of the bag, allowing your gear to warm up slowly and safely over a couple of hours.
Expert Protocol: Pre-Setting Your Focus in the Cold
To minimize equipment failure and fumbling in the dark, the guides at Peterson’s Point Lake Lodge in the NWT recommend a strict pre-setup routine. Before it gets fully dark, set up your camera on its tripod. Point it at a distant object like the horizon or a faraway light, use autofocus to achieve a sharp focus, and then immediately switch the lens to manual focus (MF). To lock this in, place a small piece of gaffer’s or electrician’s tape on the focus ring, securing it to the lens barrel. This prevents any accidental bumps in the dark from throwing your infinity focus off, ensuring your stars and aurora are perfectly sharp all night long.
Foreground Interest: Why Just the Sky Makes for a Boring Aurora Photo?
After all the technical effort to get a clean shot of the aurora, many photographers make a final artistic mistake: they point their camera straight up. A photo of just the sky, no matter how spectacular the aurora, lacks context, scale, and story. It’s a snapshot of a phenomenon, not a landscape photograph. A truly compelling image uses the aurora as a dramatic backdrop for a compositional narrative built around a strong foreground element.
The foreground anchors the image, giving the viewer a sense of place and perspective. It transforms the photo from “what the aurora looked like” to “what it felt like to stand here and witness this.” In Canada, you are surrounded by iconic foregrounds that can elevate your photography. Scouting your location during the daylight is crucial to identify these elements. Imagine the classic teepees at Aurora Village near Yellowknife silhouetted against a shimmering green curtain, or the surreal methane ice bubbles of Abraham Lake in Alberta acting as leading lines drawing the eye towards the sky. A historic church in the Yukon or a lonely, snow-dusted pine tree can provide the perfect subject.
To execute this, you often need two different focal points: one for the foreground and one for the stars. A simple technique is to take one exposure focused on your foreground subject and a second exposure immediately after, refocused to infinity for the aurora. These two images can then be blended in post-processing for perfect sharpness throughout the scene. For foregrounds that are too dark, a technique called “light painting” can be used. During your long exposure, use a weak flashlight or headlamp to “paint” light over the subject for just one or two seconds. This subtle illumination can bring out texture and detail, making the foreground pop without overpowering the natural light of the aurora.
Jasper National Park is the second largest dark sky preserve in the world, offering dark, unspoiled skies for aurora photography. The townsite nestled in the Canadian Rocky Mountains provides an abundance of wildlife, stunning mountain trails, and varied foreground options for compositions.
– Space.com, Where and how to photograph the aurora
Aurora Borealis: Why February Is Better Than December for Viewing?
Planning an aurora trip to Canada requires more than just booking a flight north. The timing of your visit can have a massive impact on your chances of success, and the logic is often counter-intuitive. While December offers the longest nights, it is often a poor choice for aurora hunting. The reason lies in weather patterns. Across much of the Canadian north, December is a stormy month, prone to heavy snowfall and, most critically, persistent cloud cover. In contrast, February marks a period of deep, stable cold. This often translates to crisp, clear, and cloudless night skies—the essential canvas for any aurora display.
Beyond weather, logistical factors also favour a late-winter trip. The holiday rush of December and January has subsided, leading to more moderate costs for flights and accommodations. Furthermore, the extreme cold of February and March solidifies the landscape, opening up unique access. In the Northwest Territories, this is when the famous ice roads open, allowing you to drive across frozen lakes to remote and exceptionally dark locations like Dettah, a small Dene community near Yellowknife, far from the light pollution of the city.
There has never been a better time to plan a trip. According to scientists, the sun is currently approaching the peak of its 11-year cycle, known as the solar maximum. This means that 2024 and 2025 are predicted to be the best years for witnessing intense solar activity and, consequently, spectacular aurora displays. Choosing a month with stable weather during this peak period maximizes your odds dramatically.
This table breaks down the key differences between the winter months for planning your Canadian aurora expedition.
| Month | Weather Stability | Tourist Costs | Special Access |
|---|---|---|---|
| December | Stormy, more clouds | High (holidays) | Standard roads |
| February | Stable, clear nights | Moderate | Ice roads open (Dettah) |
| March | Stable, warmer | Moderate | Extended daylight hours |
Golden Hour in the Rockies: Why Sunrise Beats Sunset for Lake Photography?
While the golden hour of sunrise and sunset is the most coveted time for traditional landscape photographers, its principles offer a vital lesson for the aurora chaser: the quality and direction of ambient light are what shape a landscape. For a daytime photographer in the Canadian Rockies, sunrise is often superior because the alpine glow catches the eastern faces of the peaks, and the air is typically calmer, yielding glassy reflections on mountain lakes. For a night photographer, the moon is your “golden hour” light source, and its phase and position are just as important as the sun’s.
Instead of avoiding the moon, a savvy aurora photographer learns to use it. A full moon can wash out a faint aurora, but a quarter or half-moon is a powerful creative tool. Positioned to the side of your composition, it can act as a giant, natural softbox, casting dramatic light across your foreground. This technique, known as sidelighting, reveals the texture, shape, and scale of mountains, frozen waterfalls, or forests that would otherwise be lost in shadow. It adds a three-dimensional quality to the landscape over which the aurora performs.
As one photography guide for the Canadian Rockies notes, a bright moon can be used to dramatically side-light the peaks of the Rockies, like the iconic Mount Rundle, creating stunning monochrome landscapes over which the green aurora dances. This transforms a flat, dark foreground into a dynamic and integral part of the image. The lesson from the golden hour is clear: don’t just photograph the primary light source (the sun or the aurora). Instead, pay attention to how ambient light interacts with your landscape. By tracking the moon’s phase and path across the sky, you can plan your compositions to harness its power, adding depth and drama to your northern lights photography.
Key takeaways
- Mastery over the environment is more critical than memorizing settings. Focus on defeating the lack of light, the extreme cold, and atmospheric unpredictability.
- Invest in a fast (f/2.8 or wider) lens. It is the single most important piece of gear for capturing clean, low-noise images of the aurora.
- A great photo tells a story. Use strong foreground elements and creative lighting (like the moon) to build a compositional narrative.
Atmospheric Photography: How to Shoot Moody Landscapes in the Mist?
A successful aurora photographer doesn’t just shoot the aurora; they become a student of the entire northern atmosphere. The sky is a canvas of ever-changing phenomena, and the lights are just one part of the spectacle. Embracing other atmospheric conditions like mist, ice fog, and even moonlight can add incredible mood and character to your images, turning a standard shot into an ethereal masterpiece.
The structure of the aurora itself can vary wildly, and your camera settings should adapt to capture its character. For soft, flowing curtains of light, a longer exposure (15-25 seconds) will smooth the movement into a dreamy, ethereal glow. For a very active, fast-moving display with sharp, defined “picket fence” structures, you must switch tactics. A much shorter exposure (2-5 seconds) combined with a higher ISO will freeze that intricate detail. It’s a creative choice: do you want to capture the motion or the structure?
In the extreme cold of the Canadian north (below -35°C), ice fog often forms—a suspension of tiny ice crystals in the air. While it might seem like a hindrance, it can act as a beautiful natural diffusion filter. It softens the light from the aurora and any ground sources, creating a soft, mysterious glow around your subjects. Other phenomena, such as light pillars (vertical columns of light appearing above city lights) or moon dogs (halos around the moon), are also products of ice crystals in the atmosphere. Learning to incorporate these elements into your composition adds layers of interest and a uniquely arctic mood.
One photographer vividly described their first experience in Yellowknife, which captures this magical intersection of atmosphere and emotion:
The sky in front of me glowed with luminescent bands of green light that appeared to be dancing in the wind. I grabbed my camera, tripod and ran outside to the back of the hotel and starting taking pictures with my digital camera – 3 hours later, still in my PJ’s I returned to my room – I had just witnessed one of Nature’s most amazing displays.
By shifting your mindset from simply documenting the aurora to mastering the environment, you transform yourself from a tourist with a camera into a true nightscape photographer. The next step is to take these principles and apply them in the field, turning theory into practice and frustration into awe-inspiring images. Begin by planning your next trip during a period of high solar activity and stable weather, and start practicing these techniques in a dark-sky location near you.