Riding Vancouver’s iconic Seawall can be intimidating with its strict one-way rules and bustling crowds. This guide demystifies the experience by explaining the logic behind the system. Instead of just listing rules, you’ll learn the ‘flow’ of the path, understand the unspoken etiquette for sharing space with pedestrians, and gain the confidence to ride not like a hesitant tourist, but like a knowledgeable local enjoying the city’s best asset.
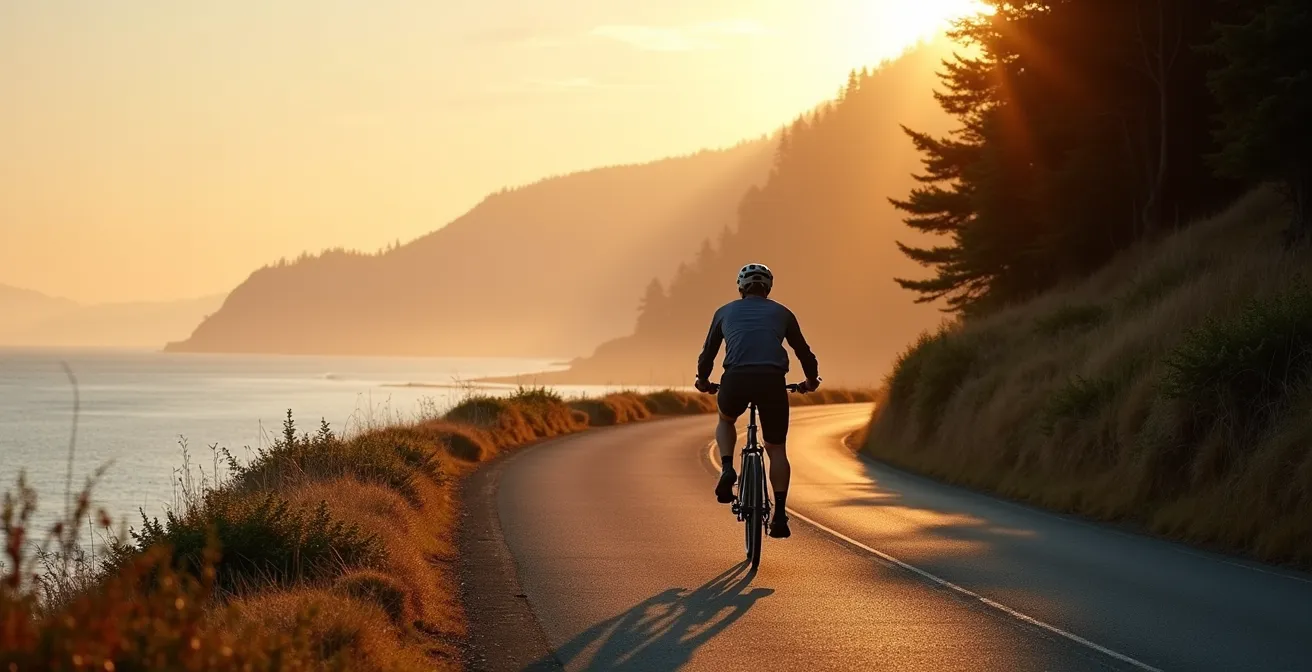
The image of cyclists gliding along the Vancouver Seawall, with Stanley Park’s rainforest on one side and the Pacific Ocean on the other, is a powerful draw for any visitor. Yet, for many, the dream is quickly met with anxiety. Whispers of a strict one-way system, crowded paths, and potential conflicts with pedestrians can make the idea of a leisurely ride feel more like a stressful exam. You want to enjoy the view, not worry about breaking an unwritten rule.
Most advice is simple and unhelpful: “rent a bike,” “follow the signs,” and “watch out for people.” But this advice misses the point. The Seawall isn’t just a path; it’s a dynamic, shared-use artery, a living part of Vancouver’s identity. To truly enjoy it, you must understand its rhythm and flow. The key isn’t just to follow the rules, but to understand why they exist, which allows for a safer, more respectful, and ultimately more enjoyable experience for everyone.
This guide is built on that principle. We’ll move beyond the basics to give you the mindset of a local cyclist. We’ll start with the most critical decision you’ll make—your bike—and then expand to show how this conscious approach to cycling can inform your entire visit to Vancouver, from sorting your recycling to choosing sustainable seafood and even planning your next great Canadian adventure. This is your manual for becoming a confident, courteous, and conscious traveler on two wheels.
To help you navigate this comprehensive guide, we’ve broken down the key topics you’ll need to master the Seawall and enhance your Vancouver visit. From immediate practicalities to future travel aspirations, this structure will guide you step-by-step.
Summary: Your Complete Guide to Conscious Cycling and Travel in Vancouver
- Mobi Bikes vs. Rental Shops: Which Is Better for a Day on the Seawall?
- Recycling in Vancouver: How to Sort Your Waste in an Airbnb?
- Ocean Wise: How to Ensure Your Sushi Is Sustainably Sourced in Vancouver?
- Stanley Park vs. Queen Elizabeth Park: Which Offers Better Native Flora?
- The SkyTrain Network: Is It Possible to Visit the North Shore Mountains by Public Transit?
- Train vs. Rental Car: Which Option Is Best for a Coast-to-Coast Journey?
- Cycling to Moraine Lake: Is the Uphill Ride Feasible for Casual Bikers?
- Is Downtown Vancouver Safe at Night? Navigating the City for Solo Travelers
Mobi Bikes vs. Rental Shops: Which Is Better for a Day on the Seawall?
Your Seawall experience begins with choosing the right bike, and in Vancouver, you have two main options: the city’s bike-share program, Mobi by Shaw Go, or a traditional bike rental shop. The best choice depends entirely on your goal. Mobi is designed for short, point-to-point trips. It’s perfect for a quick ride from your hotel to a restaurant or for exploring a small section of the Seawall. With its vast network, it’s incredibly convenient for one-way journeys.
However, if your plan is to ride the entire Stanley Park loop or spend several hours exploring, a dedicated rental shop is almost always the superior choice. Rental shops offer lighter, higher-quality bikes (including road bikes, hybrids, and e-bikes) that are far more comfortable for longer distances. They also provide helmets, locks, and maps as part of the rental package. While Mobi seems cheap for short rides, the costs add up quickly for extended use, often making a full-day rental from a shop more economical for a leisurely exploration.
This table breaks down the typical cost and use-case differences. As a case study from Cycle City, a local rental shop, highlights, most visitors spend 2 to 5 hours exploring the Seawall and Stanley Park’s trails. For this duration, the comfort and value of a rental shop bike significantly outweigh the convenience of a heavier, one-size-fits-all Mobi bike.
| Duration | Mobi Bike Share | Typical Rental Shop |
|---|---|---|
| 30 minutes | $2 (with monthly pass) | Not offered |
| 1 hour | $12.50 | $8-10 |
| 2 hours | $23.50 | $15-20 |
| Full day | $60+ | $35-45 |
Recycling in Vancouver: How to Sort Your Waste in an Airbnb?
A conscious approach to visiting Vancouver extends beyond the bike path. Respecting the local environment is a core part of the city’s culture, and that includes waste management. If you’re staying in an Airbnb or other rental, you’ll be expected to sort your waste correctly. It might seem confusing at first, but the system is quite straightforward once you understand the basic categories. Most residential buildings and public spaces, including along the Seawall, use a color-coded system.
You will typically encounter three main bins. The blue bin is for mixed containers and paper. This includes plastic bottles, metal cans, milk cartons, as well as newspapers, cardboard, and mail. The key is that items should be clean. The green bin is for food scraps and organics. This is where you’ll put all fruit and vegetable peels, coffee grounds, eggshells, and other food waste. Finally, the black bin is for garbage—items that cannot be recycled or composted, such as plastic wrap, chip bags, and foam packaging.
This three-stream system is crucial for Vancouver’s goal of becoming a zero-waste community. By taking a moment to sort your waste correctly in your rental, you’re participating directly in the city’s environmental efforts and showing respect for the community you’re visiting.
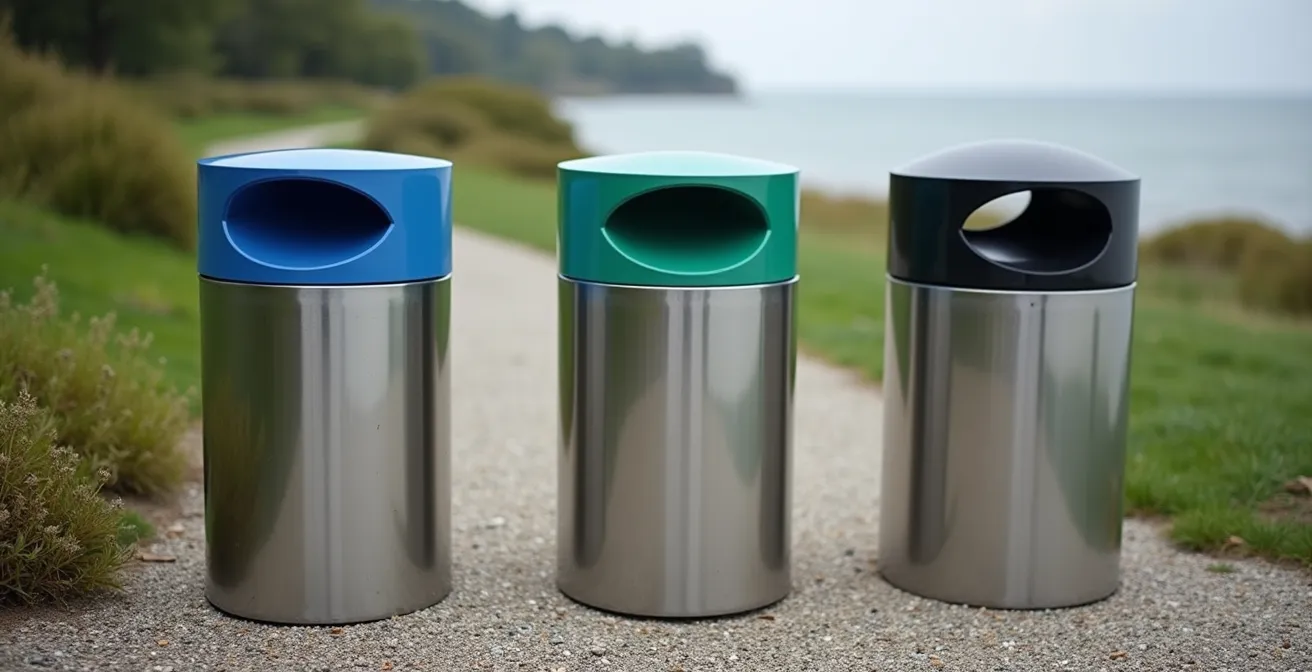
The public bins you see in parks often mirror this system, making it easy to dispose of a snack wrapper or drink bottle correctly during your ride. It’s a small action that contributes to keeping beautiful spaces like Stanley Park clean for everyone.
Ocean Wise: How to Ensure Your Sushi Is Sustainably Sourced in Vancouver?
After a long ride on the Seawall, you’ll have worked up an appetite. Vancouver is world-famous for its sushi, but as a coastal city, it’s also deeply aware of the pressures on global fish stocks. This is where the Ocean Wise Seafood program comes in. Created by the Vancouver Aquarium, Ocean Wise is a conservation initiative that helps restaurants and consumers identify and choose sustainable seafood options. When you see the Ocean Wise symbol next to a menu item, it’s a guarantee that the item is harvested in a way that ensures the long-term health of that species and the broader marine ecosystem.
Finding Ocean Wise options is easy. First, look for the small, circular fish logo on menus. If you don’t see it, don’t be afraid to ask your server which items are Ocean Wise certified. Many of Vancouver’s top restaurants are proud partners and will happily guide you. You can also check the official Ocean Wise website for a list of partner restaurants before you head out. This proactive approach not only guarantees a guilt-free meal but also supports businesses committed to ocean conservation.
Case Study: Four Seasons’ Commitment to Sustainability
A powerful example of this program in action is the partnership with Four Seasons hotels in Canada. Starting with the Vancouver location in 2012, the hotel’s YEW seafood + bar eventually curated a menu to be 100% Ocean Wise. As detailed in an analysis of their sustainable seafood program, Chef Ned Bell systematically replaced non-recommended items with sustainable choices like seasonal B.C. spot prawns and responsibly farmed shrimp. This demonstrates how a major establishment can fully embrace sustainability without compromising on quality, setting a standard for the entire industry.
Choosing sustainable seafood is another way your visit can have a positive impact. It’s a simple decision that aligns with the same conscious mindset required to navigate the Seawall with respect and care.
Stanley Park vs. Queen Elizabeth Park: Which Offers Better Native Flora?
While Stanley Park is the star attraction for cyclists, Vancouver boasts another magnificent green space: Queen Elizabeth Park. A common question from visitors is which park offers a better experience for nature lovers. The answer depends on what you’re looking for. If your goal is to immerse yourself in the authentic, wild nature of the Pacific Northwest, Stanley Park is the undisputed winner for native flora. It is a true coastal temperate rainforest, dominated by towering Western Red Cedars, Douglas Firs, and Western Hemlocks—some hundreds of years old.
The trails within Stanley Park, away from the Seawall, offer a deep dive into this ecosystem. You’ll walk on a soft bed of fallen needles, surrounded by lush ferns and moss-draped trees. It feels ancient and largely untouched, providing a genuine sense of the region’s natural heritage.

Queen Elizabeth Park, on the other hand, offers a different kind of beauty. Situated at the highest point in Vancouver, it’s a former quarry that has been transformed into a meticulously manicured park with stunning floral displays. It features a world-class arboretum with trees from around the globe and the beautiful Bloedel Conservatory. While it has native plants, the overall experience is one of curated horticultural artistry, not wild nature. For a spectacular variety of flowers and panoramic city views, QE Park is superb. But for an authentic encounter with British Columbia’s native forest, Stanley Park remains unparalleled.
The SkyTrain Network: Is It Possible to Visit the North Shore Mountains by Public Transit?
Absolutely. For the cyclist who sees the Seawall as just a warm-up, the mountains of the North Shore beckon. And you don’t need a car to get there. Vancouver’s public transit system, TransLink, is remarkably bike-friendly and provides a direct link from the downtown core to the base of the mountains. This allows you to combine an urban ride with a mountain adventure in a single, seamless day trip.
The journey is surprisingly simple and scenic. From the Coal Harbour section of the Seawall, it’s a short ride to Waterfront Station. From there, you can take your bike directly onto the SeaBus for a 12-minute ferry crossing to Lonsdale Quay on the North Shore. The SeaBus allows bikes at all times. Once you arrive, you have immediate access to the Spirit Trail, a flat and accessible waterfront greenway. If you’re aiming for more challenging terrain like Grouse Mountain or the Lynn Canyon Suspension Bridge, you can board a bus at the Lonsdale Quay exchange. A crucial rule to know is that TransLink buses can accommodate a maximum of two bikes on their front racks, so it’s best to travel during off-peak hours to secure a spot.
This transit-to-trail connection is a perfect example of Vancouver’s commitment to sustainable, multi-modal transportation. It empowers you to expand your exploration far beyond the city center without contributing to traffic or emissions.
Action Plan: Seawall to North Shore Mountains with Your Bike
- Ride from the Seawall to Waterfront Station (approximately 10 minutes from Coal Harbour).
- Take your bike on the SeaBus to Lonsdale Quay (bikes are permitted at all times for the 12-minute crossing).
- From Lonsdale Quay, access the Spirit Trail for a scenic, flat waterfront ride.
- For mountain access, transfer to a bus with a front bike rack to reach trailheads for Grouse Mountain or Lynn Canyon.
- Return via the same route, perhaps stopping at one of the craft breweries near Lonsdale Quay before taking the SeaBus back to downtown.
Train vs. Rental Car: Which Option Is Best for a Coast-to-Coast Journey?
For the truly ambitious traveler, the idea of a coast-to-coast journey across Canada is the ultimate adventure. The two primary ways to undertake this epic trip are by train or rental car, each offering a profoundly different experience. A cross-country train trip, typically on VIA Rail’s “The Canadian,” is a journey of romance and relaxation. You can watch the vast landscapes of the prairies and the rugged peaks of the Rockies unfold from the comfort of a panoramic dome car. It’s a social, stress-free way to see the country without the hassle of driving, navigating, or worrying about weather, but it operates on a fixed schedule and can be more expensive.
A rental car, conversely, offers unmatched freedom and flexibility. You can stop at any quirky roadside attraction, explore remote national parks, and set your own pace. It is often the more budget-friendly option, especially for a group or family. However, it requires thousands of kilometers of driving, careful planning for accommodation, and contending with fuel costs and potential vehicle issues. The choice depends on your priorities: passive sightseeing and comfort (train) versus active exploration and autonomy (car).
However, for most visitors to Vancouver, the relevant “coast-to-coast” journey is simply exploring the city’s extensive shoreline and nearby regions. For these local adventures, the decision is not between a national train and a rental car, but between public transit and a local car-share service like Evo.
| Criteria | SkyTrain/Transit | Evo Car Share |
|---|---|---|
| Cost per day | $11.35 (DayPass) | $89.99 (day rate) |
| Coverage area | Metro Vancouver only | Home zone + highways |
| Environmental impact | Low (electric trains) | Medium (hybrid vehicles) |
| Flexibility | Fixed routes/schedules | Go anywhere, anytime |
| Parking concerns | None | Must find/pay for parking |
Cycling to Moraine Lake: Is the Uphill Ride Feasible for Casual Bikers?
The stunning, turquoise Moraine Lake in the Alberta Rockies is a bucket-list destination. With personal vehicle access now restricted, cycling the 12-kilometer uphill road has become a popular—and challenging—way to reach it. For a casual cyclist whose main experience is a flat ride like the Vancouver Seawall, the prospect can be daunting. The key question is: is it feasible? The answer is yes, with proper preparation and realistic expectations.
The ride to Moraine Lake involves a steady ascent with an elevation gain of around 300 meters. This is a significant climb, but it is not impossibly steep. The secret is to build up your “elevation mindset” gradually. Your experience in Vancouver can be the perfect training ground. For instance, while the main Seawall loop is flat, the detour up to Prospect Point in Stanley Park is a great first test. An official park guide notes the climb in Stanley Park features a modest 60 meters of elevation gain. By mastering this, you can progressively tackle larger hills in the Vancouver area.
Here is a logical training progression a casual cyclist could follow in Vancouver to prepare for a ride like the Moraine Lake road:
- Weeks 1-2: Master the flat Seawall loop (9km) to build endurance.
- Weeks 3-4: Incorporate the climb to Prospect Point (60m gain) into your Stanley Park rides.
- Weeks 5-6: Attempt the climb from Kitsilano Beach to the University of British Columbia (approx. 100m gain).
- Weeks 7-8: For a true test, try the ride to the Cypress Mountain Lookout (400m gain over 8km).
By following a plan like this, a casual cyclist can build the necessary strength and confidence. An e-bike is also a fantastic option for the Moraine Lake ride, as it neutralizes much of the challenge of the climb while still providing the freedom and fresh air of a bike ride.
Key Takeaways
- For a full day on the Seawall, a dedicated rental shop offers better value and comfort than a Mobi bike.
- Embrace the local environmental ethos by sorting waste into the blue (recycling), green (organics), and black (garbage) bins.
- Support ocean health by looking for the Ocean Wise logo on restaurant menus when ordering seafood.
Is Downtown Vancouver Safe at Night? Navigating the City for Solo Travelers
After a day of cycling and exploring, you may be wondering about safety in Downtown Vancouver, especially after dark. Like any major city, Vancouver has areas that require more awareness, but it is generally considered a safe place for visitors, including solo travelers. The key is to stick to well-lit, populated areas and be mindful of your surroundings. Most crime that affects tourists is property-related, like theft from cars or unattended bags, and recent data shows that property crime decreased in 2024 while violent crime remains rare.
For cyclists, specific precautions are essential for night riding. B.C. law mandates a front white light and a rear red light on your bike after dark. It’s wise to stick to the well-lit sections of the Seawall, such as the paths around False Creek and in Coal Harbour. The interior trails of Stanley Park are unlit and should be avoided after sunset. Always let someone know your route and expected return time, or share your live location via a smartphone app for added security.
The safest areas to stay in Vancouver are Coal Harbour, Yaletown, Downtown Vancouver, and the West End. These areas are in the city center, and shops, restaurants, and businesses are everywhere.
– Catherine Driver, Travel Lemming Vancouver Safety Guide
By using common sense and following basic safety protocols, navigating Vancouver at night can be a perfectly safe and enjoyable experience. The same principles of preparation and awareness that make for a good cycling trip apply to personal safety as well.
By adopting a conscious and prepared mindset—whether choosing a bike, sorting recycling, or navigating at night—you can ensure your visit to Vancouver is not only enjoyable but also respectful and safe. Apply these principles to your travels here and beyond for more rewarding adventures.