Your gym fitness is a starting point, not a guarantee. The West Coast Trail requires a specific form of functional brutality that most conventional training programs completely ignore.
- The trail’s primary challenges are not distance or elevation, but relentless, load-bearing endurance on unstable terrain and vertical ladders.
- Environmental factors like extreme mud, constant dampness, and impassable tides are logistical and physical tests that can end your trek.
Recommendation: Shift your training focus from isolated strength to full-body, load-bearing movements and environmental conditioning months before you even think about booking a permit.
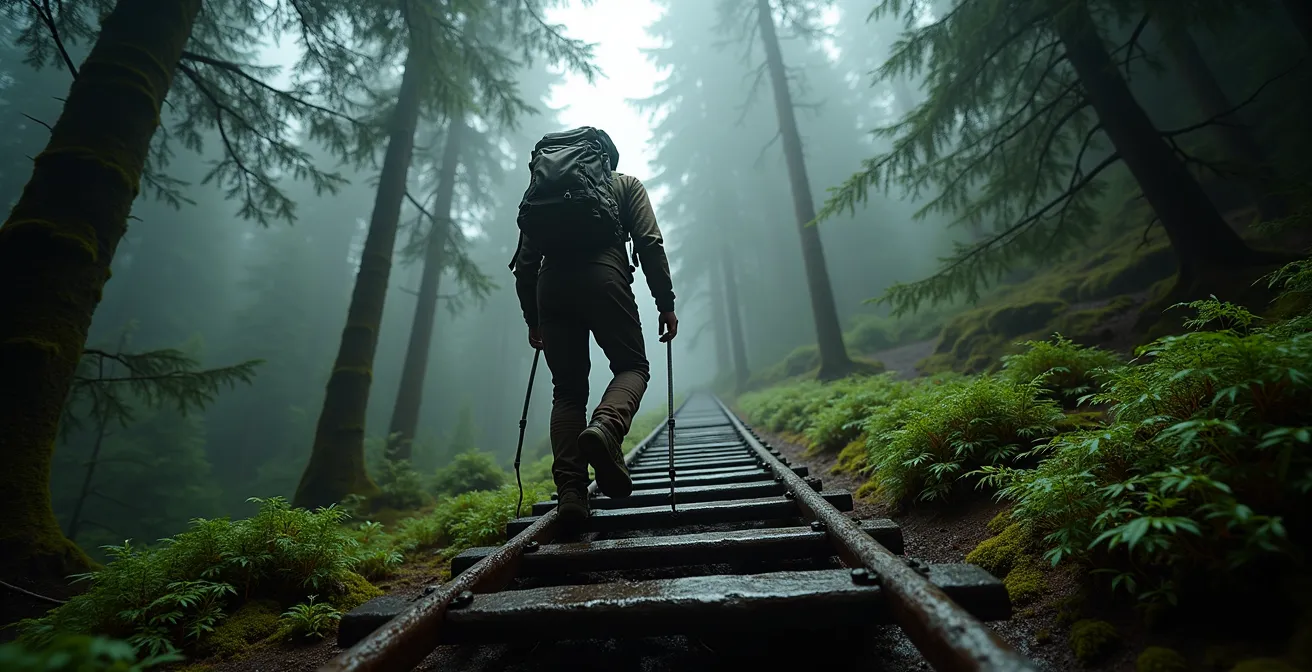
You can deadlift twice your body weight and run a 10k with ease. You’re in “good shape,” the kind of fitness measured in pounds, reps, and minutes. You look at the West Coast Trail—75 kilometres over 7 days—and think the math checks out. Let’s be brutally honest: the WCT doesn’t care about your gym stats. It’s an environment that exposes the vast gap between conventional fitness and true, functional endurance. Can a beginner hike it? Only if they understand that on this trail, everyone starts as a beginner in the face of its unique demands.
Most guides will give you generic advice: “pack light,” “wear good boots.” This isn’t that guide. We’re going to bypass the platitudes and dissect the real failure points. This is about the system shock your body will experience when your 40-pound pack feels like 80 pounds on a 100-foot vertical ladder, the psychological grind of perpetually wet feet, and the specific strength required to pull your own body across a rushing river. The question isn’t just “can you carry the pack?” It’s can you carry it up ladders, over slick logs, through knee-deep mud, for seven consecutive days, without breaking down?
This is a fitness reality check. We will analyze the biomechanics of its most notorious obstacles, the non-negotiable gear that acts as a physical extension of your body, and the environmental factors that are as much a part of the workout as the hiking itself. By the end, you’ll understand the difference between being gym-fit and being WCT-ready.
For those who prefer a visual format, the following video offers a glimpse into the terrain and atmosphere of the West Coast Trail, providing a visual complement to the practical analysis in this guide.
To navigate these challenges effectively, it’s essential to break down the preparation into specific, manageable components. This article provides a structured overview of the key survival skills and physical benchmarks you must master. The following summary outlines the critical areas we will deconstruct.
Summary: A Hiker’s Survival Guide to the West Coast Trail
- Gaiters and Poles: Why They Are Non-Negotiable on the WCT?
- The Cable Car Challenge: How to Pull Yourself Across Rivers Solo?
- Wet Feet Management: How to Prevent Trench Foot in a Rainforest?
- The Cost of Rescue: Why You Need Specific Insurance for Remote Coastal Evacuation?
- Tidal Cut-Offs: How to Read the Tide Tables to Avoid Being Trapped on the Beach?
- The Bear Canister Rule: How to Store Food When Trees Are Too Small for Hanging?
- Leg Burn: How Fit Do You Actually Need to Be for 75km of Ladders and Mud?
- Bear Safety 101: Why Bear Spray Is Mandatory for Your Backcountry Expedition
Gaiters and Poles: Why They Are Non-Negotiable on the WCT?
On the WCT, gaiters and trekking poles aren’t accessories; they are fundamental tools for movement and survival. The trail is infamous for its “peanut butter mud”—a thick, slick, and deep mire that can suck a boot right off your foot. Gaiters are your first line of defense, not just against mud, but against the constant abrasion of salal bushes and the ingress of sand on beach sections. They create a seal that protects your boots, socks, and lower legs from the elements that cause blisters and heat loss. Poles, on the other hand, transform your body into a stable tripod. They are your probes for testing mud depth, your levers for hoisting yourself over giant fallen logs, and your third and fourth points of contact on treacherous, slick-root systems. Relying on just two feet is a recipe for a fall and a potential trip-ending injury.
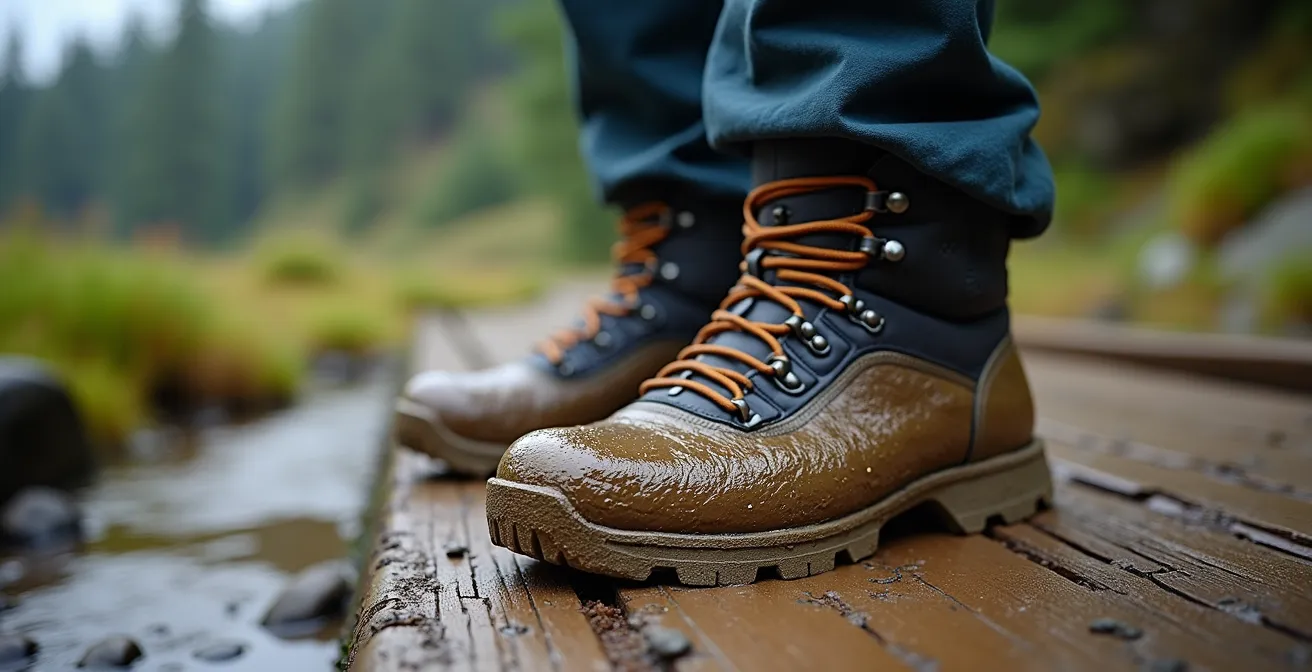
The choice of this gear is critical. As field testing by experts at VPO Abbotsford has confirmed, not all equipment can withstand the WCT’s punishment. Zippers on gaiters jam with sand and mud; buckles and strong velcro hold true. Likewise, twist-lock trekking poles are a known failure point, seizing up with grit. Aluminum poles with latch-style closures offer far superior reliability in these conditions. This isn’t about brand preference; it’s about physics and material science. The wrong gear choice isn’t an inconvenience; it’s a liability that compromises your stability and energy efficiency over 75 kilometers of hostile terrain. Think of this equipment as an extension of your own conditioned body—absolutely essential for success.
The Cable Car Challenge: How to Pull Yourself Across Rivers Solo?
The WCT’s cable cars are a unique and physically demanding obstacle, particularly for the solo hiker. These are not automated tourist rides; they are manually operated, gravity-defying metal cages that you must pull across a river using a thick, heavy rope. The Klanawa River crossing is the most notorious, as it’s the only one that is unavoidable. While they are designed for two people, waiting for another party isn’t always an option. A solo crossing requires more than just brute arm strength; it’s a full-body exercise in leverage and endurance. Attempting to muscle through it with just your biceps and shoulders is a classic rookie mistake that leads to rapid exhaustion and potential strain.
The correct technique is a biomechanical one. You must position yourself in the car facing the destination, adopt a wide, stable stance, and lean back, using your entire body weight as a counterbalance. The pull should be a coordinated movement that engages your lats, core, and legs—much like a seated row in the gym, but with far higher stakes. It’s a rhythmic, powerful motion, not a frantic series of arm jerks. Mastering this technique transforms the crossing from a moment of potential panic into a controlled, manageable challenge. It’s a perfect example of how the WCT rewards smart, efficient movement over raw, undirected power. This is functional fitness in its purest form.
Your Action Plan: Solo Cable Car Crossing Protocol
- Position yourself facing the destination anchor point with feet shoulder-width apart for maximum stability.
- Lean back to engage your body weight as a counterbalance, reducing arm strain by an estimated 40-60%.
- Execute the ‘Lock, Breathe, Reset’ technique: pull for 3-4 powerful strokes, then use the rope’s friction against the car to hold your position while you take 3 deep breaths.
- For non-emergency situations where you are exhausted, use a satellite messenger like a Garmin InReach to communicate your status, but do not trigger an SOS unless it’s a true emergency.
- When crossing with strangers, establish clear, simple verbal signals before you start: “Ready,” “Pull,” “Rest,” and “Switch” to ensure a coordinated and efficient effort.
Wet Feet Management: How to Prevent Trench Foot in a Rainforest?
The West Coast Trail exists within the Pacific Marine Ecozone of Vancouver Island, an area that receives an astonishing 330 cm of rainfall annually, with humidity often exceeding 90%. Let’s be clear: your feet will get wet. It is not a possibility; it is a certainty. The battle isn’t to stay dry, but to manage the dampness to prevent debilitating conditions like blisters, maceration, and the dreaded trench foot. This is a critical aspect of environmental conditioning that many hikers underestimate. Letting your feet remain in wet socks and boots for days on end is a direct path to excruciating pain and a potential early exit from the trail.
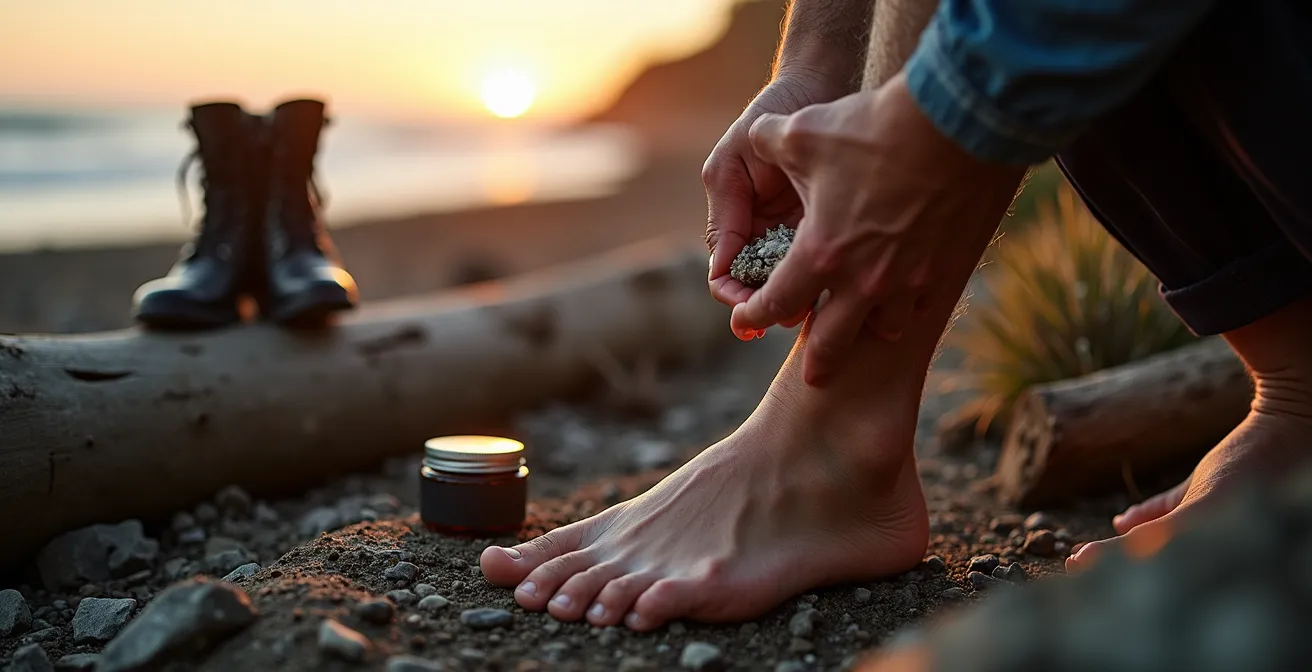
A disciplined daily foot care ritual is non-negotiable. This is as important as filtering your water or storing your food. The moment you make camp, your wet boots and hiking socks must come off. Your feet need to be rinsed, if possible, and then air-dried for at least 30 minutes. This is the time to apply a barrier cream. Many Canadian hikers swear by Watkin’s Petro-Carbo Salve, a classic remedy available in local pharmacies that creates a protective layer against moisture. Afterwards, you slip on your “sacred” dry camp socks—a pair that never, ever leaves the sanctity of your tent. This simple discipline stops the cycle of moisture-driven skin breakdown and allows your feet to recover overnight, preparing them for the next day’s abuse. Neglecting this is one of the fastest ways to fail on the WCT.
The daily foot care ritual is your best defense:
- Remove and Rinse: As soon as you reach camp, take off wet boots and socks. Rinse feet with clean water.
- Air-Dry: Let your feet air-dry for a minimum of 30 minutes. Elevate them to help reduce any swelling.
- Apply Barrier: Once dry, apply a generous layer of a barrier treatment like Watkin’s Petro-Carbo Salve.
- Sacred Socks: Put on your dedicated, completely dry camp socks. These are for sleeping and tent-time only.
- Partial Boot Drying: Place your wet insoles and socks in a waterproof bag inside your sleeping bag. Your body heat will help them dry partially overnight.
The Cost of Rescue: Why You Need Specific Insurance for Remote Coastal Evacuation?
The raw beauty of the West Coast Trail is a direct product of its isolation. This isolation is also its greatest danger. There are no easy exits. A sprained ankle that would be an inconvenience on a front-country trail can become a serious, multi-day ordeal here. Parks Canada is explicit about this reality; it can take up to 24 hours for help to reach an injured hiker. This time lag is a critical factor, but so is the financial cost of that help. Many hikers mistakenly believe that a rescue will be covered by their provincial healthcare or standard travel insurance. This is a dangerous and expensive assumption.
The key is understanding the different types of rescue. A life-threatening emergency may trigger a response from the RCAF 442 Squadron or the Canadian Coast Guard, which is covered by the province. However, the vast majority of evacuations are for non-critical issues like a broken leg, exhaustion, or a dislocated shoulder. These rescues are performed by volunteer Search and Rescue (SAR) teams or private helicopter services, and you are liable for the cost. This can range from $3,000 to over $15,000 CAD. Your standard travel insurance is almost certainly void, as most policies exclude backcountry incidents more than a kilometer from a road. You must have a policy with an “Adventure Sport” or “Wilderness SAR” add-on. For BC residents, BCAA offers this, while providers like Tugo serve a national market. Verifying your policy contains these exact terms is a mandatory step in your preparation.
This table breaks down the services and your financial responsibility, a crucial piece of information before you step on the trail.
| Rescue Type | Provider | Cost Coverage | Insurance Required |
|---|---|---|---|
| Life-threatening emergency | 442 Squadron RCAF (CFB Comox) | Province covers | Not required |
| Marine emergency | Canadian Coast Guard | Province covers | Not required |
| Non-critical evacuation | Juan de Fuca SAR volunteers | $3000-8000 CAD | Required: BCAA or Tugo adventure add-on |
| Medical taxi-out | Private helicopter services | $5000-15000 CAD | Required: Wilderness SAR coverage |
Tidal Cut-Offs: How to Read the Tide Tables to Avoid Being Trapped on the Beach?
On the West Coast Trail, the tides, not your legs, often dictate your schedule. The trail frequently forces you onto beach sections, many of which contain “tidal cut-offs” or “surge channels”—sections of shoreline that become completely submerged and impassable at high tide. Being caught on the wrong side of one of these is not an inconvenience; it can be a life-threatening situation, trapping you between a raging ocean and impassable cliffs with no escape route. This is where intellectual preparation becomes as important as physical conditioning. You must not only carry the official tide tables but also know how to read them and, crucially, how to interpret the environment around you.
Experienced hikers plan their entire day around these tidal windows. For instance, at notorious choke points like Owen Point, groups will coordinate for pre-dawn starts just to ensure they can pass through safely during the low tide window. The tide table, which uses Tofino as its reference port, is your primary tool. A safe rule of thumb is to only attempt a crossing on a falling tide, and to give yourself a safety buffer of at least two hours on either side of the printed low tide time. But what if you lose your table or misread it? You must learn to read the beach itself. The high-tide line is clearly marked by the largest driftwood logs, pushed there by the waves at their highest reach. The rocks will also tell a story: a dark, wet zone shows recent tidal coverage, while a lighter, drier zone above it is your safe haven. Missing a tide window means finding a safe spot well above this line and waiting, sometimes for 8-12 hours. The trail humbles those who think they can out-muscle or out-run the Pacific Ocean.
The Bear Canister Rule: How to Store Food When Trees Are Too Small for Hanging?
The requirement for hard-sided bear canisters at certain WCT campsites isn’t an arbitrary rule; it’s a direct response to the unique coastal ecosystem. Many experienced backcountry campers are proficient in hanging their food, a method that works well in forests with tall, strong trees. However, the WCT coastline is dominated by windswept, often stunted Sitka spruce. Their growth patterns and brittle branches make it nearly impossible to achieve a proper, safe bear hang. Parks Canada mandates very specific criteria for a food hang: it must be a minimum of 4 metres (12 feet) off the ground and 3 metres (9 feet) from the tree trunk. Finding a branch that meets these specifications along much of the trail is a futile exercise.
This ecological reality is the entire reason for the mandatory canister rule in designated zones. The habituated black bears on the coast are intelligent and persistent. An improperly hung food bag is an easy meal, which not only robs you of your vital calories but, more dangerously, reinforces a bear’s association of humans with food. This leads to escalating negative encounters and is a death sentence for the bear. Using a bear canister is not just about protecting your supplies; it is a fundamental act of wildlife conservation and respect for the environment you are a guest in. It removes the temptation entirely. Therefore, you must come prepared with an approved hard-sided canister and know how to use it correctly—sealed and stashed on the ground, well away from your tent.
Key Takeaways
- Your training must simulate load-bearing endurance on unstable terrain, not just gym metrics.
- Environmental factors like mud, rain, and tides are active opponents that require specific gear and strategies to defeat.
- Proper preparation is intellectual and logistical, involving tide table mastery, specific insurance knowledge, and wildlife safety protocols.
Leg Burn: How Fit Do You Actually Need to Be for 75km of Ladders and Mud?
This is the central question. The “leg burn” on the WCT is a different species from what you feel on the leg press machine. It’s a deep, cumulative fatigue that attacks not just your major muscle groups, but the hundreds of tiny, stabilizing muscles you never knew you had. Your gym routine builds power; the WCT demands relentless, load-bearing stability. The hardest parts of the trail are rarely the long, flat sections. The true tests are the thousands of steps up and down gnarled root systems, the slog through energy-sapping beach sand, and, of course, the ladders. There are over 100 ladder systems on the trail, some ascending over 100 feet. Climbing these with a 40lb pack pulling you backwards is a full-body workout that your gym has not prepared you for.
Let’s deconstruct the movement. A ladder climb with a heavy pack is a series of high-step lunges performed vertically. It hammers your quads, glutes, and hamstrings while demanding immense core strength to keep from peeling off the rungs. Navigating a muddy, root-filled forest section, meanwhile, is a high-intensity session for your ankles, hips, and obliques as you constantly fight for balance. This is functional brutality. Your training must reflect this. Forget isolated machine work. Your focus should be on compound, full-body movements under load. Think weighted step-ups onto a high box, barbell lunges, front squats to build core stability, and carrying heavy, awkward objects (like a sandbag) for distance. You need to train your body to be stable and strong when it’s tired and off-balance, because that will be its default state for seven straight days.
Bear Safety 101: Why Bear Spray Is Mandatory for Your Backcountry Expedition
On the West Coast Trail, you are in the territory of black bears and cougars. While encounters are not always aggressive, being prepared is not optional. Due to increased human-wildlife interactions, Parks Canada now strongly recommends that every group carry at least one can of bear spray. This is not a suggestion to be debated; it is a critical safety requirement. As wildlife experts from Parks Canada have noted, the trail’s bears have their own unique patterns, such as foraging for shellfish on the beaches at low tide, which can lead to close-quarters encounters.
The trail’s black bears are highly habituated to hikers and exhibit specific coastal behaviours, like foraging for shellfish at low tide.
– Parks Canada Wildlife Management, West Coast Trail Hiker Preparation Guide 2025
For international or out-of-province hikers, the logistics of acquiring bear spray are vital. You cannot fly with bear spray as it is classified as a weapon. You must purchase it upon arrival in British Columbia. Retailers like Canadian Tire, MEC (in Victoria or Nanaimo), or Cabela’s in Nanaimo are your best bets, with prices ranging from $45 to $65 CAD. Once you have it, accessibility is everything. The “2-Second Rule” is paramount: the spray must be on your person and accessible within two seconds. This means carrying it in a chest holster or on the hip belt of your pack, not buried inside it. Practice deploying an inert training canister before you start the trail. In a high-stress encounter, muscle memory is the only thing you can rely on. Your voice is your first line of defense—making noise at blind corners is smart—but bear spray is your last, and most important, line of defense.
The next step in your journey is not buying gear or booking a flight. It is to take this information and perform a brutally honest self-assessment of your current functional fitness, your tolerance for discomfort, and your mental fortitude. Preparation for the West Coast Trail begins in the mind.
Frequently Asked Questions about West Coast Trail Preparation
How hard is the West Coast Trail, really?
The difficulty of the WCT is often underestimated. It’s not about the daily mileage, but the cumulative fatigue from navigating extreme mud, endless ladders with a heavy pack, and technical terrain. It requires a high level of functional fitness, mental toughness, and meticulous planning, making it a significant challenge even for experienced hikers.
What is the hardest part of the West Coast Trail?
Most hikers agree that the hardest parts are the combination of relentless mud, which saps energy with every step, and the over 100 ladder systems that require significant upper and lower body strength, especially when carrying a fully loaded pack. The psychological challenge of constant dampness and difficult terrain for 7 days is also a major factor.
Do I really need bear spray on the WCT?
Yes. Parks Canada strongly recommends it for all groups. The trail is home to a healthy population of black bears and cougars. The bears are habituated to seeing hikers, and carrying bear spray—and knowing how to use it—is a mandatory safety precaution for your protection and the well-being of the wildlife.