
Getting that perfect Banff photo is less about knowing the location and more about mastering the on-the-ground challenges of access, crowds, and ethics.
- Sunrise at iconic lakes like Moraine is non-negotiable, but requires advance shuttle booking due to private vehicle restrictions.
- Ethical wildlife photography demands a telephoto lens (300mm+) and strict adherence to safety distances, turning your vehicle into a mobile blind.
- The “best” lens is a dual strategy: a wide-angle for grand vistas and a telephoto for compressing mountains and isolating details.
Recommendation: Prioritize logistical pre-visualization—planning your shuttles, timing, and lens choices—over simply trying to visit more spots. Intentionality is your sharpest tool.
Every year, millions of images of Banff National Park flood social media, yet only a handful truly stand out. They possess a quality that transcends the simple beauty of the location—a masterful use of light, a unique composition, or a powerful connection with the subject. For the aspiring photographer, the quest for these iconic shots often leads to a frustrating reality. You arrive at Moraine Lake, only to find the road is closed. You spot a bear, but it’s too far for a compelling photo. You want that dreamy, crowd-free shot of Lake Louise, but you’re shoulder-to-shoulder with hundreds of tourists.
Most guides will give you a list of “Instagrammable spots,” telling you to “go at sunrise” and “bring a tripod.” While true, this advice barely scratches the surface. It ignores the logistical hurdles and technical decisions that separate a snapshot from a masterpiece. The secret to capturing Banff like a professional isn’t just about being in the right place at the right time; it’s about understanding *how* to operate within the park’s real-world constraints. It’s about logistical pre-visualization and a deep intentionality behind every choice you make.
This guide moves beyond the postcard. It’s a photographer-to-photographer breakdown of how to tackle Banff’s most sought-after images. We’ll deconstruct the challenges—from navigating the Moraine Lake shuttle system to ethically framing wildlife and sculpting light on mountain peaks. We will explore the technical decisions around lens choice, aperture for elusive auroras, and even the legalities of capturing the region’s rustic history. This is your blueprint for turning frustration into a refined, intentional workflow that produces breathtaking results.
This article provides a structured approach to mastering the key photographic challenges in Banff. The following summary outlines each section, from conquering the golden hour at the famous lakes to the technical nuances of capturing the northern lights.
Summary: Capturing Canada: Beyond the Postcard at Banff’s 5 Most Iconic Photo Spots
- Golden Hour in the Rockies: Why Sunrise Beats Sunset for Lake Photography?
- The Ethical Distance: How to Photograph Bears Without Endangering Yourself?
- Spirit Island: Is the Maligne Lake Cruise Worth the Cost for Photographers?
- How to Edit Out Crowds from Your Lake Louise Photos (or Avoid Them)?
- Wide Angle vs. Telephoto: What Lens Is Essential for Canadian Landscapes?
- Aperture Matters: Why f/2.8 Is the Minimum for Aurora Photography?
- Trespassing Risks: How to Photograph Abandoned Elevators Legally?
- Foreground Interest: Why Just the Sky Makes for a Boring Aurora Photo?
Golden Hour in the Rockies: Why Sunrise Beats Sunset for Lake Photography?
In the Canadian Rockies, the “golden hour” isn’t created equal. While sunset can be beautiful, sunrise offers a distinct technical and atmospheric advantage for lake photography. At dawn, the air is typically calmer, producing the glassy, mirror-like reflections that make images of Moraine Lake and Lake Louise so iconic. The light itself behaves differently; the first rays of sun create a phenomenon known as alpenglow, a soft, rosy light that kisses the peaks of the Ten Peaks or Mount Victoria moments before the direct sun hits the valley. This provides a compressed dynamic range that is easier for cameras to handle, resulting in rich colours without blown-out highlights or crushed shadows.
Furthermore, the morning light sculpts the landscape. Long, soft shadows trace the contours of the mountains and forests, adding a profound sense of depth and dimension that is often absent in the flatter, more diffuse light of evening. However, capturing this magical light has become a significant logistical challenge. Parks Canada has fundamentally changed the game for photographers.
Case Study: The 2024 Parks Canada Moraine Lake Access Policy
The single most important factor for sunrise photography at Moraine Lake is access. In a decisive move to manage traffic and environmental impact, the Moraine Lake Road is now closed to private vehicles year-round. This policy means that photographers can no longer simply drive up to the lake in the pre-dawn hours. Access is strictly controlled through authorized shuttles. According to Parks Canada’s official information, the Moraine Lake Road is closed to personal vehicles, making shuttle booking an essential part of the photographic process. Operators like the Moraine Lake Bus Company and Fairview Limousine offer specific sunrise shuttles, but they must be booked well in advance. This logistical pre-visualization is now as crucial as your choice of lens.
This shift requires a new mindset. Your planning must start weeks, if not months, before your trip. Arriving at least 45 minutes before the official sunrise is still the rule, but now that time is dictated by the first available shuttle. This means your “golden hour” shot is earned through planning, not spontaneity.
The Ethical Distance: How to Photograph Bears Without Endangering Yourself?
Photographing a grizzly or black bear in its natural habitat is a quintessential Banff experience, but it comes with immense responsibility. The “perfect shot” is never worth endangering yourself or the animal. The core principle of ethical wildlife photography in Banff is maintaining distance. This isn’t just a suggestion; it’s a rule. Parks Canada regulations are clear and enforced for the safety of both humans and wildlife. This is where your gear becomes a tool for ethics, not just for image-making.
A telephoto lens is not a luxury; it is an absolute necessity. Attempting to photograph bears with a standard or wide-angle lens is irresponsible and will inevitably lead you to violate the mandated safe distances. Your vehicle is your best friend and your safest blind. Shooting from inside or using your car as a shield allows you to capture behaviour without altering it. If a bear changes its path or stops foraging because of your presence, you are too close. The goal is to be an invisible observer.
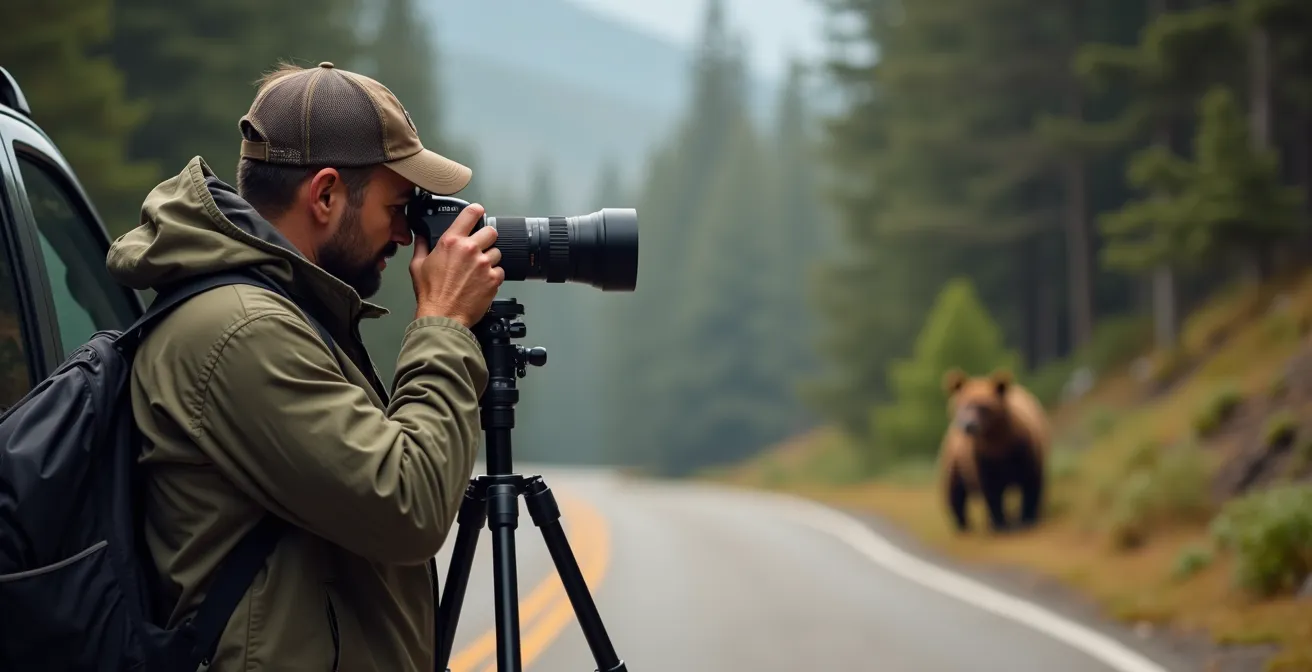
Technical settings must be adapted for unpredictable subjects. A fast shutter speed, typically 1/500s or higher, is crucial to freeze motion and ensure sharpness. This often requires a higher ISO, but a sharp, slightly noisy photo is infinitely better than a blurry, unusable one. Always carry bear spray and know how to use it. It is your last line of defence and an essential piece of safety equipment, even if you have no intention of leaving your vehicle.
Your 5-Point Safety & Ethics Checklist for Wildlife Photography
- Assess Your Lens: Do you have a telephoto lens of at least 300mm? According to Parks Canada regulations, you must stay 100 meters (about 330 feet) from bears. A shorter lens makes this practically impossible.
- Use Your Vehicle Blind: Are you photographing from the safety of your vehicle whenever possible? This provides a physical barrier and minimizes your impact on the animal’s behaviour.
- Check Your Shutter Speed: Is your shutter speed set to at least 1/500s? Animals are rarely static; this speed is essential to freeze subtle movements like a head turn or a step.
- Monitor Animal Behaviour: Are you observing the animal’s reaction? If the bear stops its natural activity (eating, walking) and looks at you, you have been “made.” Do not approach further.
- Verify Bear Spray Access: Is your bear spray immediately accessible and not in your backpack in the trunk? You should be able to deploy it in seconds.
Spirit Island: Is the Maligne Lake Cruise Worth the Cost for Photographers?
Spirit Island is one of the most revered and photographed scenes in the Canadian Rockies. Yet, it’s a location that generates significant debate among photographers, centered on a single question: is the commercial cruise the right way to capture it? The island is inaccessible by road, making a boat journey on Maligne Lake the only way to reach it. The standard cruise is efficient for tourists, but for a serious photographer, it presents major limitations.
The primary issue is light and time. The cruises typically arrive at the island’s viewpoint during midday, when the sun is high and harsh. This creates strong, unflattering shadows and blown-out highlights, stripping the scene of the magical atmosphere seen in professional portfolios. Compounding this, the stop is brief—usually just 15-20 minutes. This is barely enough time to get off the boat, let alone scout for a unique composition, set up a tripod, and wait for the perfect moment. As photographer Alex Gubski notes in his Banff and Jasper Photography Guide, this setup is far from ideal.
If you’d like a proper time to photograph the island the cruise is not the best option
– Alex Gubski, Banff and Jasper Photography Guide
For photographers seeking quality over convenience, the alternatives, while more demanding, offer infinitely more creative control. Renting a canoe or kayak allows you to reach the island on your own schedule. This is a serious undertaking involving a multi-hour paddle, but it grants you the freedom to shoot during the golden hours of sunrise or sunset. The ultimate commitment is an overnight backcountry trip, which gives you access to the sublime light of both evening and morning. This comparison clearly shows the trade-off between cost, effort, and photographic quality.
| Option | Cost (CAD) | Time at Island | Photography Quality | Best For |
|---|---|---|---|---|
| Standard Cruise Tour | $80-90 | 15-20 minutes | Poor (harsh midday light) | Tourists, quick visits |
How to Edit Out Crowds from Your Lake Louise Photos (or Avoid Them)?
Lake Louise is the crown jewel of Banff, but its popularity is also its greatest photographic challenge: the crowds. From sunrise to sunset, the shoreline is bustling with people, making a clean, serene landscape shot seem impossible. However, with a combination of on-site strategy and post-processing techniques, you can create the illusion of solitude.
The most effective method is avoidance. This means arriving at an almost uncomfortable hour. To get a prime spot with a tripod, you need to be there at least an hour before sunrise, especially in the peak summer months. According to one local guide, the trick is to arrive at LEAST an hour before sunrise to get set up. Another powerful strategy is to visit during the off-season. In winter (January to March), the crowds thin dramatically, and the frozen lake opens up entirely new compositional possibilities. You can walk out onto the ice to find a central viewpoint, capturing the Victoria Glacier without a single person in your frame.
When crowds are unavoidable, your camera and computer become your tools for removal. The median stacking technique is a game-changer. By placing your camera on a tripod and taking 10-15 photos of the same scene over several minutes, you can use a function in Adobe Photoshop (“File > Scripts > Statistics” and choose “Median”) to automatically remove any object that moves between frames—i.e., the tourists. This technique requires patience on-site but can save a shot that would otherwise be unusable. Exploring alternative viewpoints, like the path towards the Fairview Lookout, can also offer a higher perspective away from the main throng on the shoreline.
The winter season provides a completely different, but equally compelling, photographic opportunity. The snow-covered landscape and dramatic clouds create a moody and atmospheric scene. Hiking to elevated lookouts during this time can reward you with unique perspectives of the snow-shrouded peaks, offering a powerful alternative to the classic summer shot.
Wide Angle vs. Telephoto: What Lens Is Essential for Canadian Landscapes?
The question of the “best” lens for Banff is a false choice. The dramatic scale of the Canadian Rockies demands not one, but two distinct optical approaches: the expansive view of a wide-angle lens and the intimate compression of a telephoto. Mastering Banff photography is about knowing when to use each to tell a different story. A professional’s camera bag will almost always contain both.
A wide-angle zoom (like a 16-35mm) is the intuitive choice. It’s perfect for capturing the vastness of a scene—the full sweep of a lake, the towering mountains, and a dramatic sky all in one frame. This lens is ideal for establishing a sense of place and is the workhorse for classic landscape shots at places like Peyto Lake or the Bow River. It allows you to include foreground elements, like rocks or wildflowers, to create a sense of depth leading the viewer’s eye into the scene. However, relying solely on a wide-angle can become a crutch, leading to images where the mountains feel distant and less imposing.

This is where the telephoto zoom (like a 70-200mm or 100-400mm) becomes essential. A telephoto lens allows you to deconstruct the landscape. Instead of capturing everything, you can isolate compelling details: the texture of light on a distant peak, the mist weaving through a valley, or the layers of mountain ridges. This lens creates “compression,” making distant objects appear closer together. When shooting Castle Mountain from across the Bow Valley, a telephoto lens can make the layered peaks feel more massive and imposing, an effect a wide-angle could never achieve. It’s also the primary tool for ethical wildlife photography, as previously discussed. A versatile “hiking” lens like a 24-105mm can offer a good compromise if you can only carry one, but it lacks the dramatic effect of the two extremes.
Aperture Matters: Why f/2.8 Is the Minimum for Aurora Photography?
Photographing the Aurora Borealis in Banff is a challenging but rewarding pursuit. Due to Banff’s southern latitude (around 51.2° N), the auroras here are not as bright or frequent as in the subarctic. They are often a faint, ethereal glow on the northern horizon. This is a low-light scenario on an extreme scale, and your lens’s ability to gather light is the single most important technical factor. This is why a “fast” lens with a wide maximum aperture is not just recommended—it’s mandatory.
An aperture of f/2.8 is considered the practical minimum for capturing the northern lights effectively in this region. An f/4 lens will struggle, forcing you to compensate in two undesirable ways: either by dramatically increasing your ISO, which introduces distracting digital noise and degrades image quality, or by using a much longer shutter speed. A longer shutter speed (e.g., 30 seconds or more) will turn the delicate, dancing pillars of the aurora into a blurry, undefined green smudge. You need to keep your shutter speed reasonably short, typically between 10-15 seconds, to retain the texture and shape of the display.
A lens with an f/2.8, f/1.8, or even f/1.4 aperture allows you to gather enough light with a moderate ISO (e.g., 1600-3200) and a shutter speed that freezes the aurora’s movement. Location is equally critical. You must escape the light pollution of Banff and Lake Louise towns. North-facing locations with an unobstructed horizon are ideal. As recommended by Nature TTL, one of the best spots is Lake Minnewanka, because it has some of the darkest skies with a northern view in the area. Always monitor reliable forecasts from sources like AuroraWatch.ca (University of Alberta) or Space Weather Canada to maximize your chances.
Trespassing Risks: How to Photograph Abandoned Elevators Legally?
The prairies surrounding the Rockies are dotted with iconic, decaying grain elevators—haunting sentinels of a bygone era. They are incredibly photogenic subjects, offering a stark contrast to the natural landscapes of the park. However, their allure often masks a significant legal and safety risk: trespassing. In Canada, and specifically in Alberta under its *Trespass to Property Act*, entering private property without permission is illegal and can lead to fines or legal action.
These structures, often appearing abandoned, are almost always on private land. The “No Trespassing” signs are not suggestions. Beyond the legality, there are serious safety concerns. Old wooden elevators can be structurally unsound, with risks of collapsing floors, exposed nails, and hazardous materials like asbestos. Your photographic curiosity should never override your personal safety or respect for property rights. The most ethical and legal way to approach this is to seek permission. If you can identify the landowner, a polite request is often well-received. Many farmers are proud of their heritage and may grant access if you are respectful.
If you cannot get permission, your best tools are again a telephoto lens and public property. You can legally photograph anything you can see from a public road. Use a telephoto lens to isolate the elevator against the sky, compressing the distance and creating a powerful composition without ever stepping foot on private land. This approach forces you to be more creative with your angles and framing, often resulting in a more thoughtful image. Chasing a “No Trespassing” sign for a photo is not adventurous; it’s a liability. The responsible photographer knows that a great image is never worth a fine, an injury, or a conflict with the local community.
Key takeaways
- Plan for Access: Sunrise at Moraine Lake and Lake Louise requires advance shuttle bookings. Spontaneity is no longer an option.
- Ethics First for Wildlife: Use a telephoto lens (300mm+) and your vehicle as a blind. A 100-meter distance from bears is mandatory.
- Dual Lens Strategy: Pack both a wide-angle (16-35mm) for grand vistas and a telephoto (70-200mm+) for mountain compression and detail isolation.
Foreground Interest: Why Just the Sky Makes for a Boring Aurora Photo?
You’ve done everything right: you’ve monitored the forecast, driven to a dark sky location, and dialed in your camera settings. The aurora appears, and you capture it. But when you review the image, it feels… empty. A photo of just the green glow in the sky, while technically successful, lacks context and scale. The secret to a truly compelling aurora photograph lies in what you put in the bottom half of the frame: strong foreground interest.
A powerful foreground element serves several crucial functions. It anchors the image, giving the viewer a sense of place. It provides scale, showing the immense size of the aurora relative to the landscape. Most importantly, it transforms the photo from a simple astronomical record into a complete landscape narrative. The aurora becomes the sky for a scene, not the entire scene itself. Banff offers a spectacular array of foreground options to elevate your aurora photography.
The classic approach is to use an iconic mountain silhouette. The distinct shape of Mount Rundle or the saw-toothed ridge of Mount Inglismaldie instantly roots your photo in the Canadian Rockies. Reflections are another powerful tool. The still waters of Two Jack Lake or Lake Minnewanka can mirror the aurora, doubling its visual impact and filling the frame with light and colour. At Two Jack Lake, photographers specifically frame Mount Rundle with the water to capture both the aurora and its reflection, creating a uniquely layered composition. Don’t be afraid to get creative. Use the dark silhouette of evergreen trees to naturally frame the sky, or light-paint a small object like a classic red canoe in the foreground during a long exposure to add a vibrant, quintessentially Canadian subject.
By shifting your focus from simply being at a location to intentionally solving the technical, logistical, and compositional challenges it presents, you can move beyond the typical postcard shot. Apply these professional techniques on your next trip to Banff, and you will not only return with more powerful images but also with a deeper appreciation for the art of landscape photography.